DIY Pallet House Divided Sports Sign
Thank you so much for visiting! This post may contain affiliate links that I receive commissions from purchases made. Click HERE for my disclosure statement.
a
Is your house divided when it comes to sports? Here is a craft project to make to hand during your sports season.
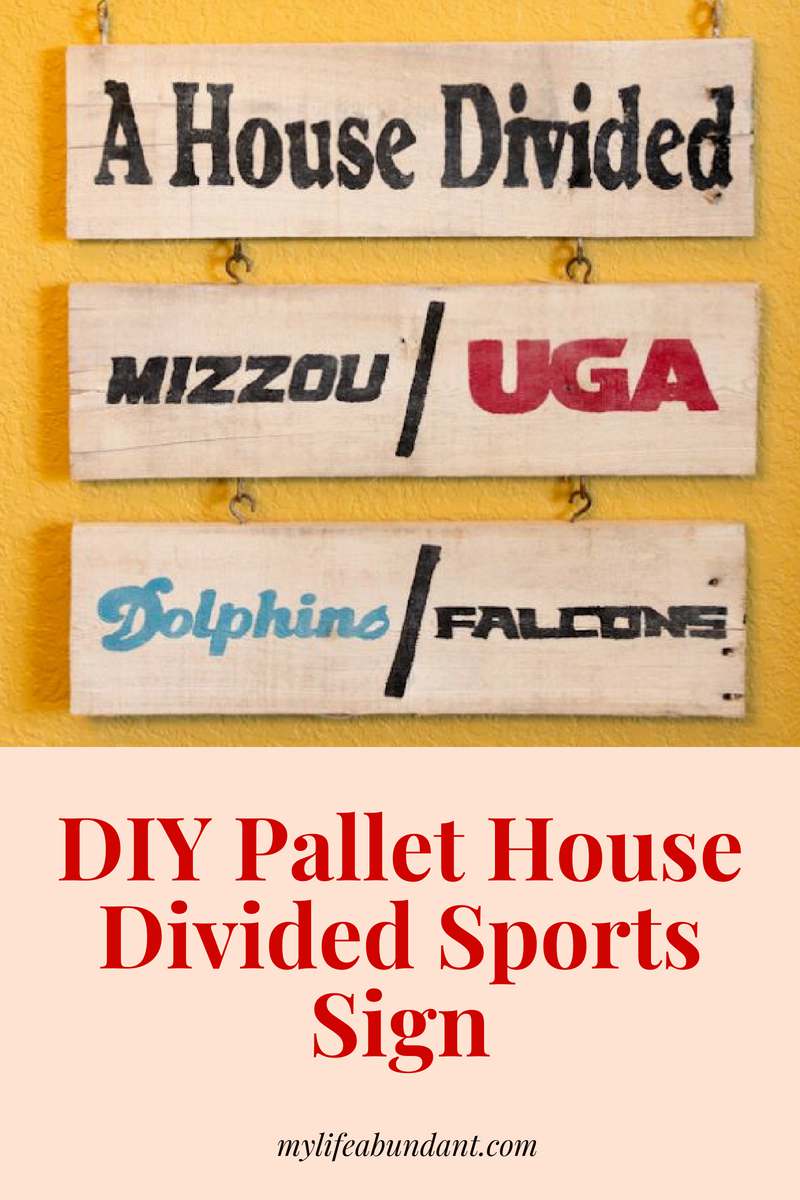
Yea!!!!! Football season is almost here. Hubby and I just love this time of the year. And since we are from 2 different states, we both love different sports teams. And when we play each other, it’s serious!! Serious fun that is. We both talk a good game weeks before the game even starts.
So, what better way to show our love for all our teams? Make a sign!

I have to admit, this was my very first project using pallet wood. Thank goodness hubby was around to help me with this project. He took the pallet apart, sawed the boards to the length I needed and put the hardware on for me. Whew! I love that man.
Supplies you will need:
- Pallet wood
- Sandpaper
- Eye Hooks
- Thick wire
- Paint and craft paint
- Wide paintbrush
- Cutting machine – I used my Silhouette
- Contact paper
- Sponge craft daubers
After the boards were cut to the desired length, I sanded down the cut edges and really bad areas where the wood was pulling off. I wanted this sign to be rough, so I didn’t do too much sanding. We found some old rusty/painted eye screws which hubby put on each board to connect them together.
I had some white ceiling paint in the garage and poured a bit in a mason jar and added just enough water to make it very thin. It was about a 1:1 ratio. I was wanting to “whitewash” the boards to give it an aged look. I painted a couple of coats and let dry overnight.
I next made a different stencil for each board using my Silhouette. You can buy letter stencils, but a cutting machine really makes this job a breeze. I used contact paper so the stencil would stick on the sign and I would end up with cleaner lines and less paint bleeding. You can use card stock or scrapbook paper too, but then you have to tape it down in a lot of places. Paper also doesn’t hold its shape when it gets wet from the paint. Contact paper just seemed like an easier solution.
I made each stencil the length and width of the board and then just typed out the words. I also added cut lines so each stencil would cut the 5.5 x 20 inches I needed. That way I don’t have to guess on cutting with scissors and no worries about measuring. The picture below shows 2 stencils on one sheet 12 inches by 20 inches. The third stencil was cut by itself.
I was able to find free fonts for the teams lettering by doing a Google search for NCAA or NFL teams downloadable fonts. Since my stencil is longer than the normal 12-inch cutting mat, you can read here on how to cut a longer piece of vinyl/contact paper without a cutting mat. I used this tutorial for the settings since I hadn’t used contact paper yet with my Silhouette. I did change the blade level from 2 to 1. That way only the contact paper was cut and let the backing alone.
HINT: Cut your contact paper a few inches longer than your stencil size. Since its thinner and you aren’t using a mat, you will need the extra to push the contact paper up a bit in the cutting area of your machine so it won’t curl under the blade. Use the bar lever on the right on a Silhouette to raise the bar to push the contact paper toward the back. Don’t forget to put the lever back up before starting the cutting.
Next, you will pull each stencil apart from the backing and place on each board. Don’t forget the center parts of letters like A, B, etc. Press around each letter to make sure its secure on the wood. I also used a clean dauber and tapped up and down over the letter areas and it helped to secure it more to the wood. Since my boards are not smooth, the contact doesn’t stick well, so I took it slow for each letter. But for this project, I wasn’t really worried about the lines being perfect.
Now its time to stencil.
Using the sponge daubers, add a small amount of craft paint on a paper plate and then add a small amount of paint to the dauber. Using the dry stencil method, tap up and down with paint over the exposed wood areas. Don’t move your brush side to side or the paint will go under your stencil. I wasn’t worried about being perfect with the paint because I wanted the sign to look a little aged and rough.
I let it dry for a little bit and then slowly pull off the stencil to reveal all the beauty. Don’t forget the little areas in the middle of some of the letters. Sometimes I have to use an old pair of tweezers to pull them off. Let dry overnight. The next day I painted a thin coat of the whitewash over all the letters and blotted off some of it with a cloth. This made it look like some of the letters had faded.
I then added thick gauge wire we had in our stash in the garage as a hanger.
I really loved how this turned. Hubby loved it too! We will always enjoy it during football season.
Even though we are a House Divided during football season, our hearts are always one.
Enjoy,
Tammy
* * * *
Tammy
I’m a country girl living my geeky boomer life, while figuring out widowhood. Between digging in the dirt, my camera, thrifting finds, and cooking, I’m a child of God walking this next chapter with Him leading the way.
Read more about me and check out my media kit. Our Privacy Policy
That is such a great idea! And it totally came out awesome. I would love to attempt to make one,t oo!
Thank you Robin. It was pretty easy to make.
OK, you can make an Ascending Butterfly sign next! This came out great! 🙂
LOL Thanks Tracy!
That’s so cool. I have never made my own stencils (although I have stenciled). You make it look so easy (and fun).
Thanks Nancy
What a cute sign. I love pallet art! What a cool machine too that helps you to create those letters! Very fancy!
Thanks Cindy. Any cutting machine would work for this project or you can just buy stencils.
That is the cutest DIY pallet project. I’d love to make something similar to this. I’ve been wanting to use pallet wood to make a headboard and this might be the inspiration I needed to just do it.
Thanks Terri. Oh a headboard would be beautiful!!
Such a cute result!
Fun to have created something that is so specific to your tastes. I like the DIY projects myself.
Thanks
This is cute! I bet you could make a killing at your local farmers market, selling these!
Thank you Kristen. I’ve thought about that.
That looks so cool! My kids went to universities that were big rivals in football. It would be fun to try making one of these.
Thank you Liz
That looks so easy to do! I would love to start a project similar to this.
Thank you
That was really cool! I wish I was as crafty as you! Well, my family only roots for one team so I guess ours would read “A House United.” Thanks for sharing!
I love that idea Annemarie!!
OMG!! You’re so creative!!! I love seeing DIY’s this is amazing, I’m gonna try this.
Thank you Nikki.
You make it look so easy! I’m not a crafty person but this I think I could manage to make, thanks for sharing!
Thank you Maria.
This is such a fun idea. Luckily we are both Steeler fans here so we aren’t divided but there are plenty of Steeler/Eagle couples that we know that would love a sign like this! <3 Christine, The Choosy Mommy, http://www.choosykids.blogspot.com
You could make a House United sign for your family!! Thanks for stopping by Christine.
What a nice DIY idea! You make it seem so easy to make!
Thank you Elizabeth.
Tammy, I love this! What a great way to show everyone’s favorite teams. Great job on the tutorial!
Thank you Jann
This is such a creative idea. I am not too big on sports myself but my mom is a Cowboy’s fan. I will definitely be telling her about this idea.
Thank you Victoria
You never cease to amaze me with your creativity. This looks amazing and once again, I will have to share this with my momma. She is going to love this!
Thanks so much Lauren.
What a fun project!! We love football and we are a house divided, as well!! For us it is UF & UGA.
Thanks Rebecca.
This is my first year in many to sit out football season. I did used to get so hyped up over it though. Fun times. 🙂
Oh Rosey. Sorry to hear that.
What a fun project. I think if I had a Cricket machine I would be doing something everyday…it all looks so fun!
You can buy premade stencils to use on a project like this too Tiffany.
That’s really cool! What a fun project. It came out great!
Thanks Camesha
Love your sign, although our house isn’t divided…LOL…we all like the same teams:) Looks great.
You could make one just for your teams and call it a House United
OMG…I really love this. I am always looking for new craft projects with pallets. This is a really cool way of making a sign for football season.
I know I will be making this real soon. it also gives me and my husband something to do together.
thanks fr the idea and the post.
Thank you Debbie. This was fun to make
Tammy, this is very awesome idea! Love love this! Gave me an inspiration what project to do next for my room!
I love this project! Stopping by from Blogger Brags – hope to see you next week! Cheers, Kendra
I love, love, love the way this turned out! I recently bought a cricut explore and I’ve been trying to find some inspiration for ways to use it…. Something like this will soon be hung in our house, so thanks for inspiring me to create some new decor! 🙂
Oh I would love to see how yours looks. The cutting machine makes this project so easy